Do you want to supercharge your prospecting and leading generation efforts by easily uploading CSV files to LinkedIn Sales Navigator? Thankfully, you can do this with the Sales Navigator Advanced (Team) plan. This means if you currently have a Sales Navigator Core (Professional) subscription, you’ll need to upgrade to the Advanced version to use this feature.
This feature is extremely valuable as it allows you to import data from other business databases, like Crunchbase, Wappalyzer, or job boards, directly into Sales Navigator. Instead of manually searching for companies one by one using the search engine, you can upload your Excel file in bulk, saving you a lot of time and effort.
In this comprehensive guide, you’ll learn how to upload CSV files to LinkedIn Sales Navigator like a pro. We’ll also answer the common questions about LinkedIn Sales Navigator CSV upload and explore how you can use Octopus CRM LinkedIn automation tool with Sales Navigator.
How to Upload CSV Files to LinkedIn Sales Navigator: The Steps
Creating account lists using CSV files is one of the best ways to organize your prospecting and outreach efforts. The best part? You can upload your CSV files to Sales Navigator, supercharging your outreach campaigns.
Follow the steps below to import lead lists on Sales Navigator.
Step 1: Access Account Lists
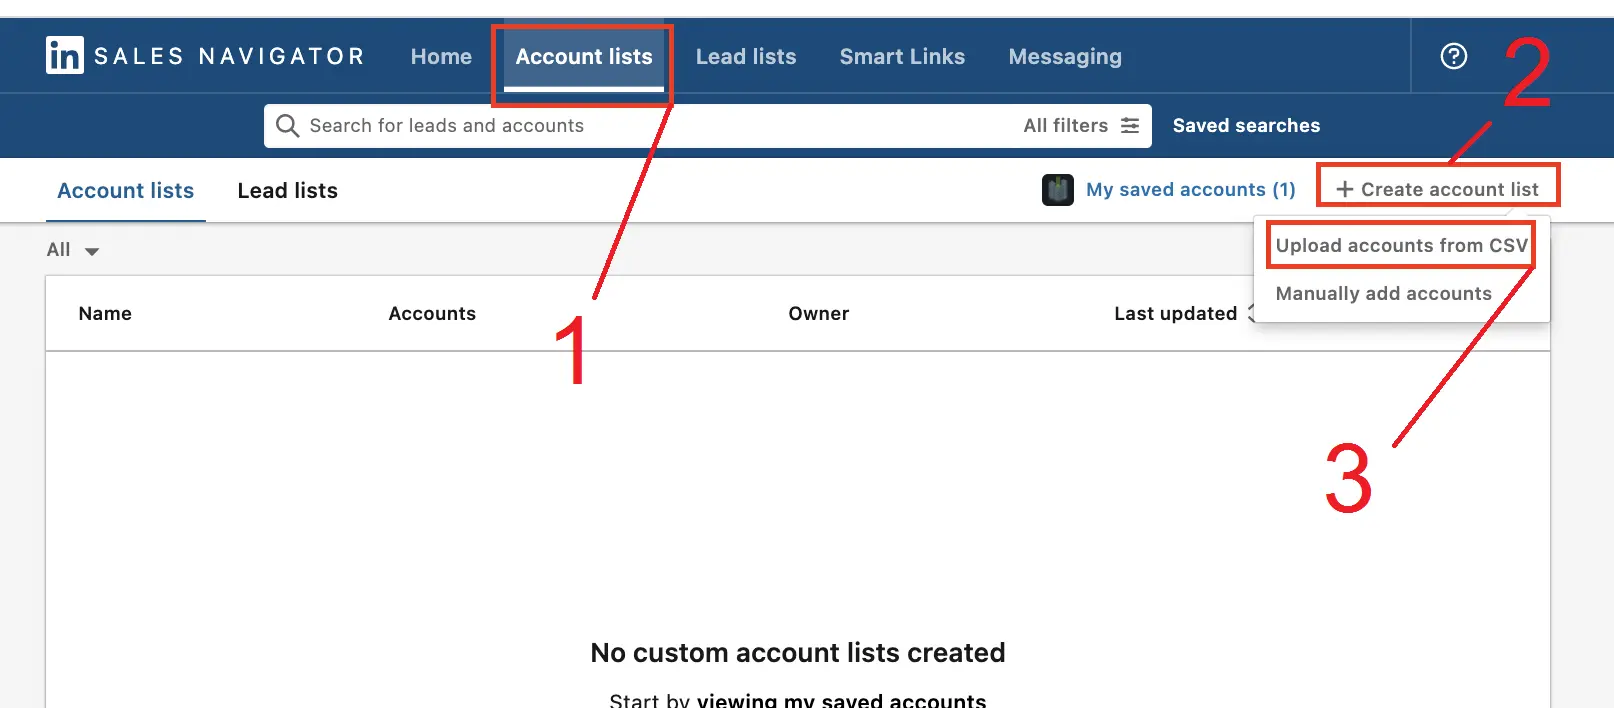
Head over to your Account Lists to initiate the CSV upload process on LinkedIn Sales Navigator
Follow these steps:
Open the LinkedIn Sales Navigator and head over to the “Account Lists” tab. Remember that this feature is available exclusively to users with a Sales Navigator Advanced subscription.
Once you’re in the Account Lists tab, proceed to upload your CSV file.
Step 2: Upload Your CSV File
Click on “Create an Account List” and choose “Upload an Account from CSV”.
As you execute these steps, keep in mind these key points:
- LinkedIn allows a maximum of 1,000 companies per upload.
- Ensure that you have at least the company name.
- For optimal results, provide additional information such as IDs and website URLs. This extra data improves LinkedIn’s ability to match your CSV with the correct companies.
Pro Tip: If you have the LinkedIn URL of the company page, it’s time to use it! LinkedIn can easily identify the company in its database with this information.
Step 3: Map Data Inputs
After uploading your file, LinkedIn will guide you through the process of matching the column headers in your CSV file with the required input fields.
Follow these simple steps:
Align the columns in your CSV file with the related data fields and click “Launch”.
Step 4: Let LinkedIn Work Its Magic
Once you’ve launched the CSV upload, a “CSV” tag will appear next to the name of your list. Be patient, as LinkedIn typically takes between 5 to 30 minutes to fetch the companies, depending on the file’s size.
When the list is prepared, you can begin your LinkedIn outreach campaign. In many cases, perfect matches can be achieved by inputting only the company name and website.
But keep in mind that LinkedIn can occasionally make mistakes and link companies in your list with incorrect company pages on the platform.
You have two choices to overcome this problem:
Option 1: Ensure perfect matching by collecting LinkedIn URLs in advance. This proactive approach minimizes the need for manual verification.
Option 2: If you choose not to provide LinkedIn URLs, you’ll need to spend some time manually double-checking and verifying the outputs.
The second method can be more time-consuming and tiresome, so you may want to try the first option.
So, you see, it was not so difficult to upload your CSV file, so much so that we’re sure you’ll say uploading my CSV to Sales Navigator was a breeze.
Continue reading this article or check out how to use LinkedIn Sales Navigator. Additionally, you may want to learn how to export LinkedIn contacts with emails.
Common Questions About LinkedIn Sales Navigator CSV Uploads
We understand that you may have additional questions about using CSV uploads in LinkedIn Sales Navigator.
Here are answers to some common queries:
1. Can You Import Lead Lists on LinkedIn Sales Navigator?
Unfortunately, LinkedIn Sales Navigator does not allow the import of lead lists to ensure compliance with privacy rules. This feature is exclusively available for Account Lists.
2. What to Do After Uploading Your CSV File?
After successfully uploading your CSV file, the next step is to identify decision-makers within the organizations in your list. Here’s how:
- Go to the “Lead Search” option in LinkedIn Sales Navigator.
- Navigate to the Workflow Section and proceed.
- Choose the list you’ve uploaded in the account list filter.
- To pinpoint decision-makers, add filters such as job titles or seniority levels.
For example, you can use these filters to find COOs among the companies in your CSV file.
Explore our guide on how to leverage LinkedIn Sales Navigator filters for optimum results.
Exploring Other LinkedIn Sales Navigator Advanced Features
LinkedIn Sales Navigator Advanced (Team) offers more than just CSV uploads. Here are a couple of additional features that can enhance your LinkedIn prospecting:
1. Sales Navigator Smart Links
Sales Navigator Smart Links lets you create sales presentations that combine files and websites. You can then easily share and monitor how your prospects interact with the content.
It’s a powerful tool for enhancing your outreach efforts because you can engage your prospects with compelling presentations, keep an eye on their engagement, and tailor your follow-up strategies based on their interactions.
2. LinkedIn TeamLink LinkedIn
TeamLink assists sales teams in identifying warm introduction methods to engage their prospects. This feature shows whether people in your search results are among the first-degree connections of your team members, making it easier to leverage existing connections for introductions.
This means using TeamLink, you can tap into your team’s network and access warm introductions. This, in turn, enhances your credibility and increases your chances of successful outreach.
How to Use Octopus CRM with LinkedIn
Octopus CRM for LinkedIn is a Google Chrome extension designed to supercharge your prospecting efforts and save you up to 95% of your valuable time. But how Octopus CRM works?
Well, with Octopus CRM, you can:
- Send Personalized Connection Requests: Craft personalized connection requests to engage your target audience, including premium profiles.
- Automate Messaging: Streamline your communication by automating messages to your first-level contacts.
- Auto-View Profiles and Endorse Skills: Increase your visibility and credibility by automating profile views and skill endorsements.
- Build Marketing Funnels: Create targeted marketing funnels on LinkedIn to nurture your leads.
- Monitor LinkedIn Stats: Keep a close eye on your LinkedIn performance and evaluate your results.
But how do I use Octopus CRM with LinkedIn, you ask?
Octopus CRM is compatible with LinkedIn accounts: Basic, Premium, Sales Navigator, and Recruiter Lite. It operates in the background, allowing you to multitask while Octopus CRM handles your LinkedIn activities.
Plus, Octopus CRM seamlessly integrates with Zapier, enabling data transfer to hundreds of apps, including HubSpot CRM, Zoho CRM, Asana, Google Sheets, and more.
The tool consists of two components: a pop-up window for profile transfers and a CRM page for managing your LinkedIn interactions. It streamlines the entire process, making LinkedIn prospecting more efficient and effective.
Step 1: Profile Transfer
In the LinkedIn search, whether in LinkedIn Basic or Sales Navigator, filter your target profiles as you please. Then, use the pop-up window to send the profiles to your CRM.
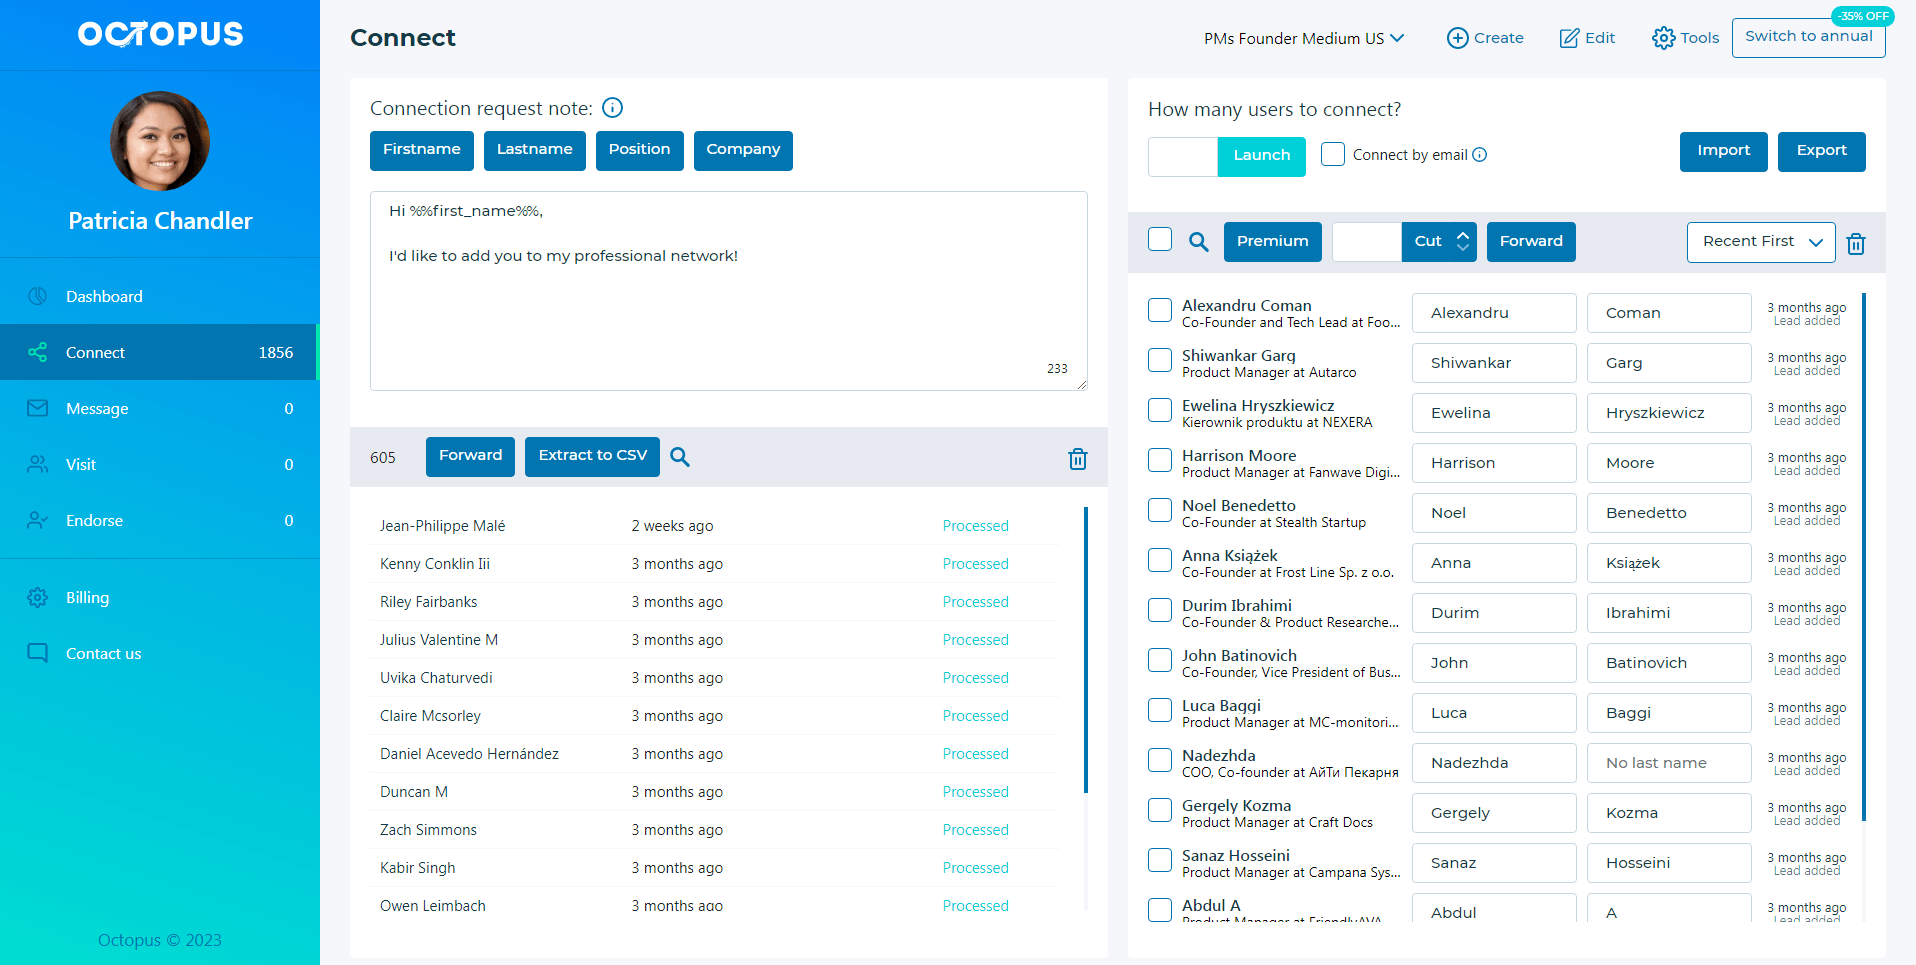
Step 2: CRM Page Management
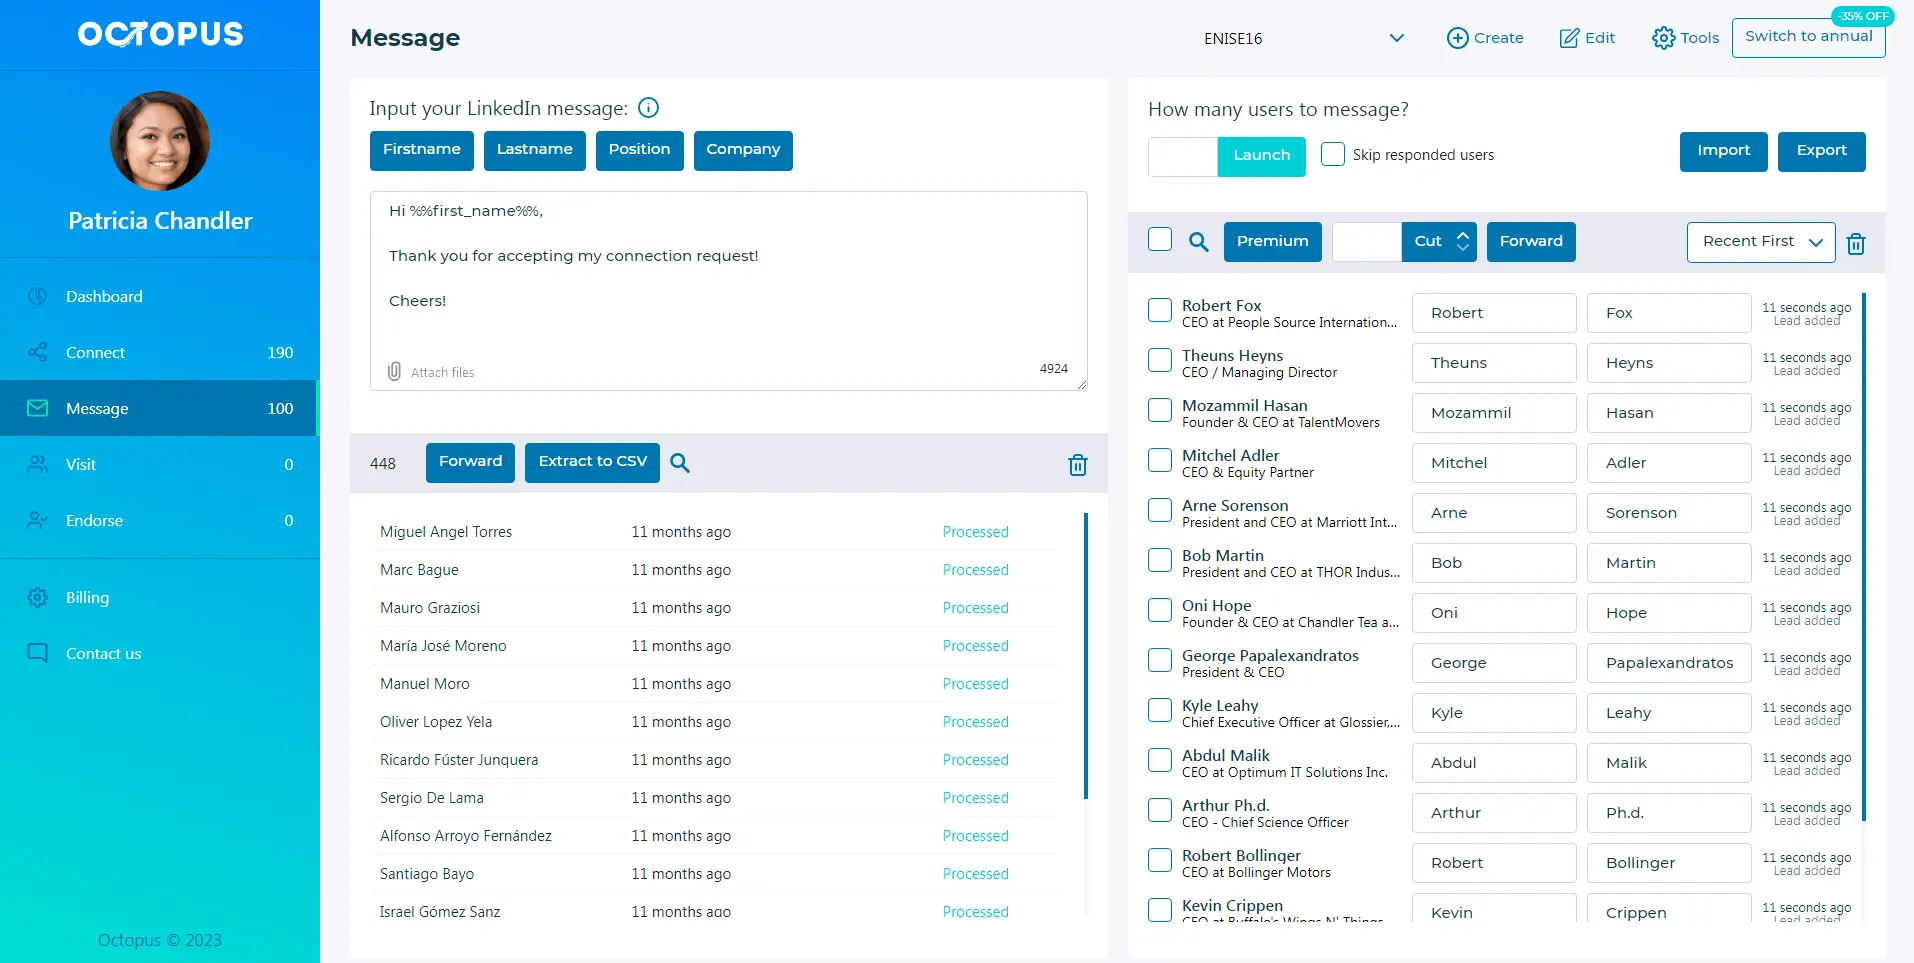
Head over to your CRM and pick the needed tab: Connect, Endorse, Message, or Visit, conditional on your desired action. Next, click on the “Launch” button to begin the process of sending connection requests or messages, viewing profiles, or endorsing skills.
You can create and fill user lists for each action, transfer profiles from LinkedIn, and process these lists in the CRM.
Also, you may want to have a look at the best LinkedIn scrapers out there.
Conclusion
Uploading CSV files into LinkedIn Sales Navigator is a game-changer for your prospecting efforts. Follow the steps explained in this article to seamlessly upload your CSV files, save valuable time, and expand your network with ease.
What’s more, Sales Navigator offers advanced features like Smart Links and TeamLink to further enhance your LinkedIn prospecting capabilities. And with Octopus CRM on your side, you can take your prospecting to the next level, automating and optimizing your outreach efforts.