You installed Octopus CRM software and now what? Probably you’re a bit confused on how to use this LinkedIn automation tool, therefore in this article, I am going to provide you with the detailed guidelines on how Octopus for LinkedIn actually works, show you the features and explain everything in details.
Get ready for some useful content! 🙂
P.S. I hope you’ve already watched our demonstration videos of the software we recorded for you. If not, please watch Octopus CRM video tutorial.
Octopus for LinkedIn is a google chrome extension designed to boost your prospecting efforts and save up to 95% of your time.
The software allows you to send personalized connection requests to your target audience (and even send invitations to premium profiles only) on LinkedIn, auto-message your 1st level contacts, auto-view profiles and auto-endorse their skills, build marketing funnels on LinkedIn, observe your LinkedIn stats and evaluate results.
Octopus CRM compatible with LinkedIn Basic, Premium, Sales Navigator and Recruiter Lite accounts, and operates in a background mode allowing you to do other things while Octopus is working instead of you. And Octopus CRM can be integrated with Zapier to push data from LinkedIn to hundreds of apps including Hubspot CRM, Zoho CRM, Asana, Google Sheets and others.
The tool consists of two parts:
A. The pop-up window – created to let you transfer profiles from LinkedIn to the CRM.
B. The CRM page – created for you to work with the users you transferred using the pop-up window.
Here is a brief explanation of the process: you go to the LinkedIn search (either in LinkedIn Basic or Sales Navigator), filter users as you wish and, using the pop-up window, transfer profiles to your CRM. Then you open your CRM, select the needed tab (Connect, Message, Visit, or Endorse), depending on what action you would like to perform and press “Launch” to start sending connection requests / messages / view profiles or endorse skills. Therefore, first of all, we build and populate the lists of users under each action (by transferring users from the LinkedIn) and then we work with these lists in the CRM page.
P.S. No worries if this sounds complex now, I will be more specific and show you the entire process with examples and screenshots soon.
Let’s have a look at the pop-up menu:
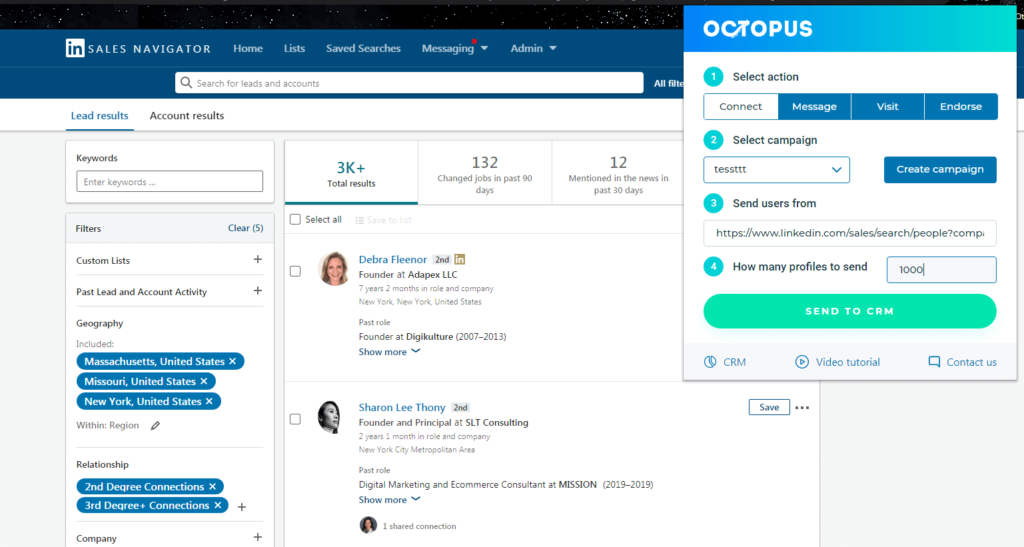
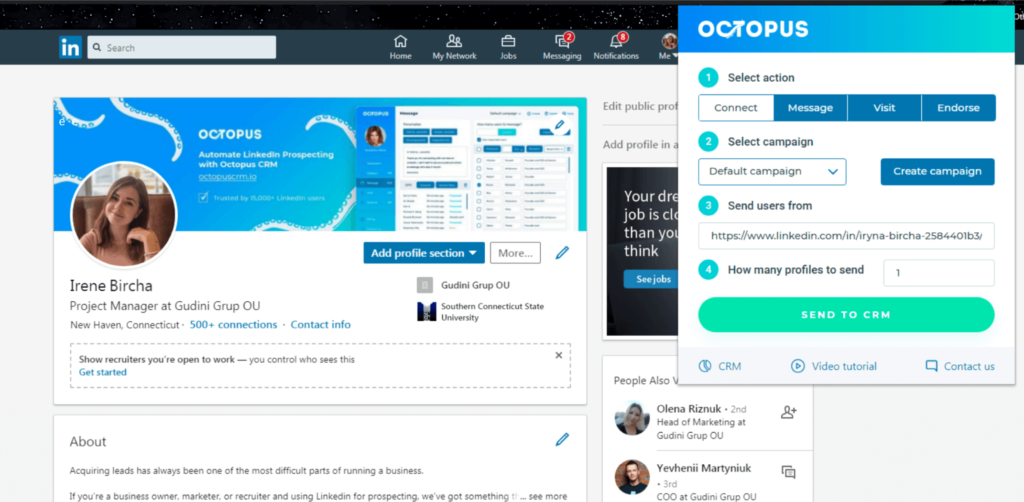
Once you click on the chrome extension, this pop-up window will show up. As you already know, this pop-up is needed to send profiles from LinkedIn to your CRM page.
To transfer profiles from LinkedIn to your CRM page, you need to:
STEP 1. Open the pop-up menu and click on the needed action (e.g. choose “Connect” if you’re going to send profiles to the CRM and then send connection requests, or select “Message” if you want to send automated messages to a specific group of LinkedIn users and so on)
STEP 2. Select the campaign. You can leave this by default as for now.
With Octopus, you can create campaigns (separate lists of profiles) under each action and then forward different users to different campaigns to split the audiences and keep them separately.
STEP 3. Decide on how you would like to transfer users:: you can do that either from the LinkedIn search or the My Network page on LinkedIn. If you decide to send profiles from the My Network Page, it means that the profiles will be transferred to your CRM page from “My Network” on LinkedIn starting from the very top of the page (e.g. if we take Rob’s account as an example and select “My Network” and decide to transfer 3 profiles, it means that Emma Jone, Giles Dean and Jessica Wong will appear in your list)
In case you decide to send profiles from the LinkedIn Search, you go to the search page either in LinkedIn Basic or Sales Navigator, then filter profiles as you wish, click on the chrome extension to open the pop-up menu, select “Search” in the STEP #3 and press “+” nearby to paste the link from the LinkedIn search into the corresponding section.
STEP 4. Input the number of profiles you would like to transfer (max. 1000)
STEP 5. Press “Send to CRM” and wait till it’s done.
Now let’s have a look at what we have in the CRM:
- Dashboard with various LinkedIn stats, including the number of connections you have, pending invitations sent, profile views in comparison to the previous week, your weekly search appearances, your profile rating, social selling index, the endorsements of your top skills and your activity for the past 7 days.

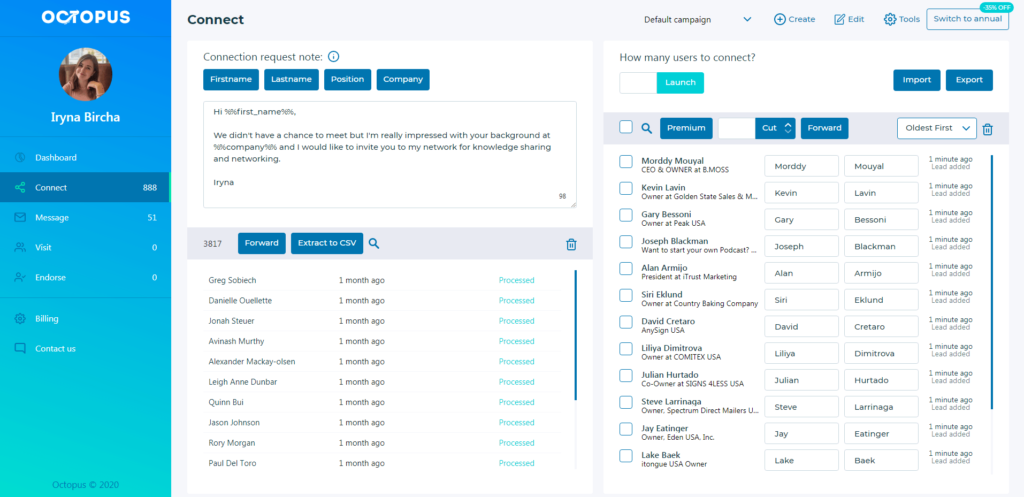
- “Connect”, allows you to manage users you want to connect with, and eventually send personalized connection requests. Here is what you can find here:
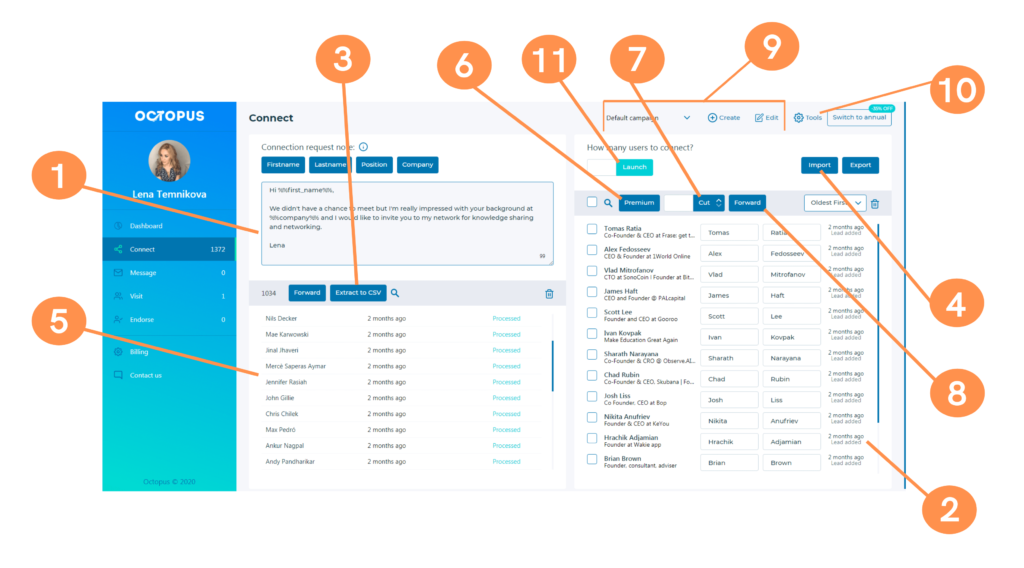
1. MESSAGE TEMPLATE – allows you to input a custom note that will be sent along with your connection request. Use “First Name”, “Last Name”, “Company” and “Position” buttons to make your message more personalized.
2. LIST OF USERS – here you can see the entire list of users you’ve transferred from the LinkedIn search, edit their First and Last name, remove these users from the list. To delete users from the list, simply check them and click on the basket at the right side of the screen.
3. EXPORT TO CSV – allows you to export data (first name, last name, email, website, LinkedIn URL, company, position) of your processed users to the CSV file
4. IMPORT – you can now upload the LinkedIn profile URLs to the CRM for “connecting”, “messaging”, “visiting” or “endorsing”.
5. HISTORY – shows you the users, which already received your connection invitation. Once you process them with Octopus, they will be forwarded from the main list (#2) to this section. Important! If a particular user is in the list of processed users (history), Octopus won’t let you add this user to the main list. This has been done for you to avoid sending connection requests & duplicate messages once again. In case you clear the history up using the small basket, you’ll be able to add such users again.
6. PREMIUM – this button removes all free LinkedIn profiles from the list and let you work with users who have paid LinkedIn profiles only.
7. CUT – removes a specific number of LinkedIn users either from the top or bottom of the list. So, you input the number, select the needed side, and press “Cut”. Works super simple.
8. FORWARD – this button allows you to transfer LinkedIn users from one campaign to another. You click on it, check the needed campaign (you can actually select more than one) and press “Forward”…That’s it. All users will be copied and pasted to the selected campaign. As you probably noticed, there are two FORWARD buttons: one is located above the main list of users and the second one is in the list of already processed users. Therefore, you can not only send users from the main list to another campaign, but also send the already processed profiles to another campaign.
9. CAMPAIGNS – Octopus gives an ability to create multiple campaigns. You can create different campaigns with different lists of the users you would like to connect to split the audiences and keep them separately. Select the campaign from the drop down menu and the list will be updated automatically. To create a campaign, click “CREATE” and enter the campaign name. To delete a campaign, press “DELETE”.
10. TOOLS – opens an additional pop-up that gives you access to a few more great features: “Link campaigns” and “Zapier integration”.
“Link campaigns” allows you to tie up two or more campaigns together and eventually build a funnel. You can activate it in your connecting campaign, and it will start sending those users who accepted your connection invitations to the selected campaign. Just go to “Tools” and in the “Link campaigns” section select a campaign (e.g. choose messaging campaign if you want to send automated follow-up messages to those who accepted your connection requests) and press “Save”. Then you can launch Octopus and once your connection requests are accepted, these users will appear in the selected campaign. Watch this video to learn more about this feature.
“Zapier integration” is created for advanced users and allows to push data from LinkedIn to Zapier / Hubspot. Due to the complexity of this feature, we highly recommend watching this video to see how it works in practice.
11. LAUNCH – once you press this button, Octopus will start sending connection requests. Just do not forget to input the number of users into the section nearby. Seat back and relax while the software is working for you.
- “Message”, this tab contains the lists of LinkedIn users you’ve selected to be messaged. This page looks almost identically to the “Connect” page, the only difference is you won’t find the “Assign” button here. Other than that, it works the same.
- “Visit”, this tab also speaks for itself and gives you an opportunity to auto-view profiles. Everything works the same: you transfer profiles from the LinkedIn Search, select the number of users you want to automatically visit and press “Launch”.
The main reason of why you have to view profiles is the following: as soon as you visit the profile, they get an immediate notification that you’ve viewed their profile and 15-20% of users will open your profile in return. That’s a wonderful way to get extra attention from your target audience.
- “Endorse”, this feature works pretty straightforward and auto-endorses from 3 to 7 skills on each LinkedIn profile you’ve selected.
- “Billing”, here you can upgrade / downgrade your plan, cancel your subscription, see the status of your account and your subscription date.
I hope this information was helpful, and as always, do not hesitate to contact our customer care team if you’re still having questions